![]() If you want to skip the introduction, and jump right in, then just start reading from here.
If you want to skip the introduction, and jump right in, then just start reading from here.
If I told you that you can still use Windows XP to surf the web safely without a firewall, antivirus software, and updates, you would probably think I am crazy. But that is possible! I have been doing it for many years. And just to make things clear, I don't use Windows 10 at all. I don't run XP in a sandbox on a Linux machine. XP is on my main computer, and it's the only operating system I use. I use it for just about everything. I use Windows XP primarily because it is fast and doesn't waste a lot of memory. Plus I have some old programs that would either run slowly or not run at all in the latest version of Windows.
For me, using XP is all about SPEED. I have a very simple way of measuring computer performance. When you press the power button on your computer the first time, how long does it take before you can see your desktop icons and start to work? How many seconds does it take for it to come on? It takes only 18 seconds for my computer to boot up after it was completely shut down. Secondly, when you click on shut down or press the power button to turn your computer off, how many seconds does it take to turn off? For me, it takes 4 seconds. In 4 seconds, all the lights go out and the fans stop. I don't care how many cores your computer has or how many terabytes of memory it has. If it takes a million years for it to start up and shut down, then it is slower than my PC and I wouldn't buy it even if you gave it to me for free. Mine is pretty fast! Finally, when you click on Microsoft Word or your web browser or any program, how many seconds does it take to come on? Word comes up instantly on my computer. Most other programs start in 1 or 2 seconds. So, it's pretty fast. My computer is a dual-core 3GHz Intel Pentium 4 with 1GB RAM, and I have XP installed on a 60GB SSD. On this page, I am going to show you how you can get this kind of performance out of your PC as well. It all comes down to installing Windows the right way, then tweaking it to run faster and avoiding programs that slow down your computer.
I write programs and create websites occasionally, and I believe that software developers should use old computers to test their sites and programs! When creating a website or writing a program, if you test it on the fastest computer, you won't know how most users will experience your website or program. If your program is slow, you'll never know! So, it's important to develop software on an older machine. Let's be realistic, not everyone has the latest iPhone. Most people do not have the best computer in the world. They may pull up your website on an old phone or install your program on a computer that is already running slow. Why give your users an unnecessary headache?
Okay, the purpose of this guide is not to make everyone go back to Windows XP but to help those who like XP and still use it to get great security without sacrificing performance. When you finish installing Windows and test it without additional software, your laptop or computer is as fast as it will ever be. The moment you start installing programs, the system begins to be slower. Certain programs will slow it down more than others. Antivirus softwares will reduce your computer's performance by about half. When you start using Windows XP without antivirus software, it feels like you got a brand new computer!
Normally, when you install Windows XP out of the box, it is very poorly configured and has many vulnerabilities. This guide will show you step by step how to lock down your computer, so no hacker can have access.
This guide is NOT intended for you if...
you're paranoid. I know some people who like to put a password on everything. They have a password for their phone, TV, laptop, and car. They have security cameras. They use the strongest WiFi password and VPN. Everything is password protected, and they are still scared. If you are this type of person, then this guide is not intended for you. No matter how many layers of security and passwords you add, nothing is going to make you feel safer. People are usually scared because they don't understand how something works. This guide explains how to install and configure XP, but it doesn't explain why this configuration works.
If you're going to use Windows XP without an antivirus, you will need to follow some very strict guidelines so you don't get infected. For example, you should have a handful of programs that you already use and trust. If you like to download new softwares all the time, then using XP without an antivirus is not recommended.
If you visit XXX websites or click on links in emails and open attachments and you don't know how to tell a document from a program, then this guide alone won't be enough. This guide is only intended for people who do not engage in risky behavior and they use precaution. Let me be very clear: IF you download programs and visit virus-infested websites all the time, then you should definitely use an antivirus software!
If you use your PC to access files on Z: drive located on a company server on the local network, then this guide is not for you! Following this howto guide will disable networking and will only allow basic internet access. You'll be able to check your emails, surf the web, watch YouTube, use Facebook, BitTorrent, FTP, etc. But if you want to use network printers or file sharing or connect to a home group, those things won't work!
If you only have Windows Home Edition, you MUST get the Professional Edition. In this guide, you'll be using features that are only available in the Professional edition! The Home edition does not give you access to all the controls and settings that you'll need to change.
![]() If you have just finished installing Windows XP Professional, click here.
If you have just finished installing Windows XP Professional, click here.
STEP 1: Make a backup of all your data first! If your Windows doesn't start, try pressing F8 at startup and select Safe Mode. If that doesn't work, use a Linux CD to gain access to your files. Linux works just like Windows, except you don't have to install it. It can boot from a CD, and you can have full access to your computer in minutes. Creating a bootable Linux CD or USB pendrive is beyond the scope of this article, but you can find more information about it here.
STEP 2: Disconnect your computer from the internet. Unplug the ethernet cable. Make sure you have your product key and all the setup disks for your programs ready.
STEP 3: Install Windows on a 60 GB solid-state drive to achieve maximum performance. Don't install XP on a hard drive that is larger than 120GB. If you must install XP on a 2TB hard drive, then XP should be the first primary partition, and that partition should be less than 120GB. But my advice is that you keep your DATA and OS on two separate drives.
If you want to install XP on a computer that currently has Windows 7 or 10, consider removing the hard drive. Install XP on a new hard drive. Some newer computers have components that are totally incompatible with Windows XP. The XP drivers don't exist, so you'll be forced to go back to Windows 10. And if that's the case, you'll be thankful that you didn't overwrite Windows 10.
On my computer, I have Windows XP and MS-DOS installed on the same partition, so I start the installation by formatting the drive using FORMAT.COM. Then I run SYS C: to install the system on drive C:. Once I have installed the system, I copy WXP2SATA.ZIP on the hard drive. This file contains all the Windows XP SP2 setup files with added support for Intel SATA drives. I unzip the file into C:\INSTALL\I386 and run SMARTDSK and then WINNT.EXE to start Windows setup.
Windows Setup will ask you if you want to convert the drive from FAT to NTFS. I always select "Leave it as it is," because I want to be able to access it from DOS later.
Make sure your hardware is good. Needless to say, your motherboard and hard drive and RAM should be in perfect condition. If the SMART status of your hard drive is signaling trouble, get a new hard drive! If your memory is bad, replace the memory before you start installing anything! You'll receive all sorts of weird error messages and blue screens throughtout the setup process if you have bad hardware.
Some computers will act like the memory is going bad if you touch the RAM, because the contact is bad. Sometimes the same thing can happen with the SATA cable. If you touch the cable, you'll get weird CRC hard disk errors, read errors, etc. I hate it when that happens! First you need to get yourself a good computer that runs reliably.
STEP 4: Activate Windows and install all the necessary drivers. Remember, you MUST STAY DISCONNECTED from the internet throughout this time!!! Do not connect to the internet even for a minute!
Do NOT install any third-party software or driver installer or any automatic driver downloader. You must have your drivers ready and install them manually one by one.
NOTE: Some driver packages may take up 500MB of space, and when you run SETUP.EXE, they will install a huge bloated software package on your hard drive, which you don't need and never use. The driver itself is only a few megabytes in size while the entire software package is enormous. For this reason, you should look for a folder that contains the actual driver files and install the drivers ONLY, not the entire package! Go to Device Manager, and install the drivers for the unknown devices one by one.
NOTE: Old Intel drivers have a security flaw! Many of them were designed to be automatically updated by Intel. Then someone figured out how to hack the updater, and they were able to send malicious code onto people's computers who used these Intel drivers. Intel's solution was "more updates." My solution is NOT to install the defective driver in the first place! The name of the driver that is responsible for the update process is called "Intel Management Engine." When you install any Intel drivers, make sure you either disable this or just skip it entirely and install only the rest.
STEP 5: Change Network Card Settings
Go to Control Panel >> Network Connections. If you have any LAN or wireless LAN cards in your computer and the drivers are properly installed and enabled, you should see them here. Right-click on each item, and go to Properties. You're going to repeat these steps for each device:
1. Go to Properties.
2. You'll see a list. Make sure to UNINSTALL every single item except "Internet Protocol (TCP/IP)." Once this item is the only item remaining, double-click on it and click on the "Advanced" button. (Windows XP may ask you if you want to restart your computer after you uninstall an item. Please do not restart your computer yet.)
3. Click on the "WINS" tab. Uncheck "Enable LMHOSTS lookup" and disable the "NetBIOS over TCP/IP" option.
4. Go to the "Options" tab and click on "TCP/IP filtering," then click on the "Properties" button.
5. You'll see three columns. Above IP Protocols, select "Permit Only" and click on Add. Enter "1" and click OK. Repeat this adding 2, 3, 4, 5, 6, 7, 8, and 53 to the list. Once you're done with this, click on OK.
6. On the previous window, click on OK. OK. OK... Then go to the next network device, right-click on it, select Properties and repeat these steps again.
STEP 6: Make All File Extensions Visible
Go to Control Panel >> Folder Options. Click on the "View" tab. I usually don't like when "hidden files" are hidden. I like to see everything and be in control over everything that happens in my computer, and I don't like when a program tries to hide or mask its identity. So, we're going to change some settings in here. First, uncheck the first item on the list, which is "Automatically search for network folders and printers." This only hurts your performance, so this needs to be unchecked. Next, check each of the next 6 items ending with "Do not cache thumbnails." Click on "Show hidden files and folders." Uncheck the next 3 items, which are 1) "Hide extensions for known file types" and "Hide protected operating system files" and "Launch folder windows in a separate process." Finally, scroll down to the bottom of the list and uncheck the last item, which is "Use simple file sharing." Click on OK.
STEP 7: Remove Alt Users
Click on the Start menu >> Run. Type in "LUSRMGR.MSC" and press Enter. A new window called "Local Users and Groups" will open. On the left side, click on "Users." A list will appear on the right, and you are to delete every item from this list except "Administrator" and "Guest." To delete an item, right-click on it, and select Delete. If you have previously created any user profiles, this will not erase those profiles from the hard drive. This action will simply deny all other users from logging in.
Make sure the Guest account has a little red X in front of it to indicate that it is disabled.
Now, click on "Groups" on the left. A list will appear on the right side. Make sure to delete every item from this list that CAN BE deleted. The first 8 items cannot be deleted. If there are more then 8 things listed, the rest of them should be deleted.
Close the "Local Users and Groups" window.
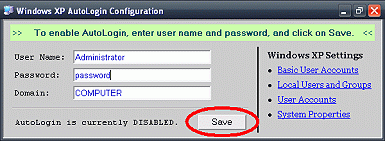
Btw if you would like Windows to ask you for a password every time you log in, you can set that password by going to Start >> Control Panel >> User Accounts. If you want to have a password but not have to enter it every time you log in, I have created a little program called AUTOLOGIN.HTA. You can download it here or by clicking on the image below. Save it as a plain text file and then change the file's extension from ".TXT" to ".HTA" Double-click on it to start. Enter your password once, and then click on "Save."
STEP 8: Disable Unnecessary Services
Click on Start menu >> Run. Type in "SERVICES.MSC" and press Enter. Click on the "Standard" tab on the bottom. Find the "TCP/IP NetBIOS Helper" service from the list, and double-click on it. Change "Automatic" to "Disabled" from the pull-down menu, and then click on the "Stop" button and OK.
Follow the same steps to disable and stop each of the following services. If you can't find one of these services on the list, just skip it and go to the next one:
Alerter Ati HotKey Poller:Ati HotKey Poller Background Intelligent Transfer Service Clipbook Computer Browser Distributed Link Tracking Client Fast User Switching Compatibility Google Update Service (gupdate) Google Update Service (gupdatem) Indexing Service Internet Connection Sharing (ICS) IPSEC Services Machine Debug Manager Messenger Microsoft Help Center Microsoft Update RunOnce Service MS Software Shadow Copy Provider NetDDE:Network DDE Netlogon NetMeeting Remote Desktop Sharing Network DDE DSDM Portable Media Serial Number Service QoS RSVP Remote Desktop Help Session Manager Remote Registry Schedule:Task Scheduler Secondary Logon Security Center Server Smart Card SSDP Discovery System Restore Filter Driver System Restore Service Terminal Server Device Redirector Driver Uninterruptible Power Supply Upload Manager UPnP Device Host Telnet Remote Desktop Services Routing and Remote Access Volume Shadow Copy WebClient Windows Error Reporting Service Windows Management Instrumentation Driver Extensions Windows Time Windows Update Windows User-Mode Driver Framework WMI Performance Adapter Workstation
Close the services window.
STEP 9: Restrict Access To Your PC From The Internet
Click on the Start menu >> Run. Type in "GPEDIT.MSC" and press Enter.
A new window called "Group Policy" will open.
(Unfortunately, GPEDIT is not available in Windows XP Home Edition. It is only available in the Professional Edition of XP. This is why you should use the Professional Edition. The Home Edition cannot be properly secured.)
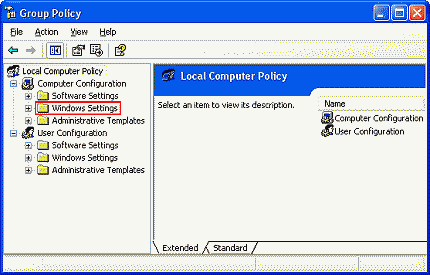
Double-click on "Windows Settings" on the left, then double-click on "Security Settings" below. Double-click on "Local Policies," and click on "User Rights Assignment."
On the right, you'll see a list. Double-click on "Access this computer from the Network." Remove everybody from the list. Click OK. Windows XP will threateningly ask you if you're sure, creating the impression that you are selecting a potentially dangerous option here. LOL Click on YES!
Repeat the above procedure for each of the following:
Now, find this line: "Deny access to this computer from the network" Double-click on it. Select every item on the list and click on the "Remove" button. Then click on the "Add User or Group" button and enter the word "Everyone" and click on OK. Then click on OK once again.
Find this line: "Deny logon as a batch job" Double-click on it and remove everyone from the list. Then click on the "Add User or Group" button and enter the word "Everyone" and click on OK. OK.
Find this line: "Deny logon locally" Double-click on it and remove everyone except "Guest" from the list.
Find this line: "Deny logon through Terminal Services" Double-click on it. It should have only one item in the list: "Everyone"
Find the following line: "Log on locally" Double-click on it. Make sure it only has "Authenticated Users" and "Administrators" in the list! Remove everything else. If it doesn't have those two, then you need to add them.
On the left, click on "Security Options." Somewhere in the list on the right side, you will see this item: "Devices: Restrict CD-ROM access to locally logged-on users only." Double-click on that item and Enable it. Double click on the next item, which is "Devices: Restrict floppy access to locally logged-on users only." Enable that one too.
On the left, click on "Administrative Templates" under "Computer Configuration." You'll see a list of 4 items on the right. Double-click on "System." Scroll down a bit and double-click on "Turn off Autoplay." Enable this on all drives. Click OK.
You may now close this window.
STEP 9: Disable Remote Connections
Go to Control Panel >> System. Click on the "Remote" tab and uncheck the option to "Allow Remote Assistance invitations to be sent from this computer." Click on OK.
Since you're here, you might as well click on the "Advanced" tab and go to the User Profiles Settings. You'll see a list. If you see "Unknown Account" in that list, delete it. Click on OK.
Click on Startup and Recovery Settings.
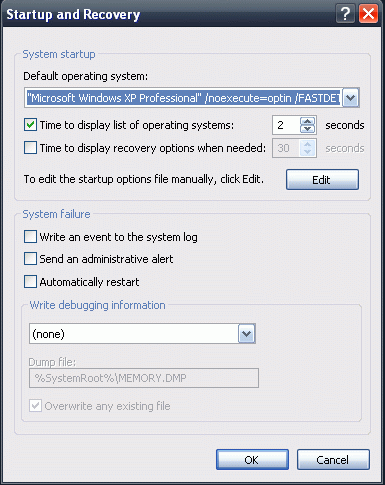
Uncheck everything on this page except the first item, which is "Time to display list of operating systems." Change that number to 2 or 3 seconds. Below where it asks about writing debugging information, select "(none)" from the list. Click on OK.
Click on the "Error Reporting" button. Select "Disable error reporting" but put a checkmark next to "But notify me when critical errors occur." Click OK. OK.
STEP 10: Block Bad Websites
Windows allows us to redirect websites. We use this feature to redirect bad sites and ad servers to a blank page. Thus we automatically block a bunch of things without the need for any sophisticated program. All you have to do is download this file: HOSTS.TXT and save it on your desktop. Remove the ".TXT" ending and then move it to C:\Windows\System32\Drivers\Etc. There is already a HOSTS file there, and Windows will ask you if you want to overwrite it! Click on YES.
STEP 11: Registry Tweaks
There are lots of other important changes that still need to be done. And instead of me telling you to open Registry Editor and modify such and such keys in the registry, I have written a JavaScript program that produces a .REG file, so we simplify this step. What would normally take over an hour will now take less than a minute!
To download the program, click here: TWEAKS.TXT and save this as a plain text file on your desktop. Change the ".TXT" ending to ".JS" and then double-click on this program. After you run this program, you should restart your computer. After that, you may connect the internet cable.
STEP 12: Installing Other Software
Congratulations! You have installed Windows XP on your computer. But don't stop here! Install some of these programs. They are great programs and will not reduce the performance of your XP system. These are all compatible with Windows XP and will make your computer a lot smarter, a lot more useful. So, I highly recommend installing these :
Windows Media Player 10 Windows Movie Maker 2.0 Microsoft Office 2003 or 2007 (Note: If you install Office 2003, you should also install the 2007 Compatibility pack that allows you to open Word 2007 (.docx) documents in Word 2003.) CCleaner 1.38 (Note: Newest versions of CCleaner don't work with XP, so download an older version. Recommended version: 1.38) Windows Script 5.7 Setup Picasa 3.9 Presto! ImageFolio LE 4.1.7 PhotoScape 3.4 MyPal Web Browser Supermium Web Browser K-Lite Codec Pack 13.8.5 Full Ahead Nero Burning ROM 8.3.6.0 QuickBooks Pro 2000 [search for download link] Foxit PDF Reader & Editor 4.3 MTS Video Converter PC-Study Bible 2.1 QuickVerse Bible 4.0 TuneXP BitTorrent WinZip, WinRAR, 7-Zip TinyPerl 5.8 QB64 Python 3.4 PHP 5.2 OllyDbg 2.0 HxD Hex Editor OE Classic Pro Starter 5.6 UltraISO Premium 8.1 Recuva 1.51 VLC Media Player 2.2.2 HD Tune Pro [search for download link] Webster Dictionary The following programs either no longer work or are so outdated that they have too limited functionality today:
Mozilla Firefox 43 KMeleon 75 Google Chrome 43 WinSCP X-Setup Pro 9.2
Of course, any chain is only as strong as its weakest link. If you use Windows XP without an antivirus software, then you must not install softwares on your computer that have vulnerabilities. For example, Internet Explorer 6 and all versions of Adobe Flash Player will make your computer vulnerable to attacks. Internet Explorer 6 can be configured to be safe, but it is a lot of work, and most websites today are incompatible with IE6, so its uses are very limited anyway.
Certain softwares don't pose a threat, but they will slow down your computer for no reason. For example, if you don't use Java apps, then don't install Java on your computer in the first place! If you don't use any program that requires NET Framework, then do not install NET Framework! Usually when a program requires NET Framework to run, I search for an alternative that does not require NET Framework. Silverlight, AOL, QuickTime, and various toolbars, searchbars, automatic driver installers, and certain games will slow down your PC to a crawl. If you need a music player, I highly recommend VLC Media Player and/or K-Lite Codec Pack. Both of these are great for XP and will not reduce overall system performance.
|
|